Using RapidWeaver to Generate Help Files for iPhone App
January 11, 2010 Filed in: iPhone
I’m no HTML guru. I can read it and, with great labor, write it. Since I use RapidWeaver for all of my websites, I decided to see if I could use RapidWeaver to create the help files on the iPhone app.
Here I describe my process for doing this.
1) Create the RapidWeaver Document With an Appropriate Theme
RapidWeaver (RW) uses “Themes” as templates for its webpages. The vast majority of themes available for RW are geared towards computer screens. Those that are geared to the iPhone have more bells and whistles than I would desire for a help document. I really only want RW to handle my multiple pages easily, plus give me the WYSIWYG editing I desire.
The theme I’m currently using for my prototype is the RW supplied theme “iPhone” (no big surprise here). This has a sidebar feature that I will eventually edit out.
Another possibility is using the “No-Theme” from EikePreuss.de. This has no frills to it, but lacks an appropriate setting to specify 320 pixels as the default web page width. To use this, I would need to edit it, too.
Once you’ve got your HTML page(s) set up, you will need to have RW export them.
2) Export the HTML Directly to Your Project Folder
I’ve been a lazy developer, in that I’ve not set up a central Source Code Management system. My SCM consists of duplicating the entire directory containing my XCode project at every reasonable step of development. This is suffices quite nicely, as I rarely need to go back to previous versions of source code, and I don’t share development with anybody.
So, to keep my help files lock step with my code, I export my HTML directly to the project directory. (I could also keep my RW document in the project directory, but for different reasons, I don’t do that now...)
In the directory containing my XCode project, I create a folder called HTML, and this is the folder to which I export my RW generated web pages. Here, I give the exported webpages the name “Help”:
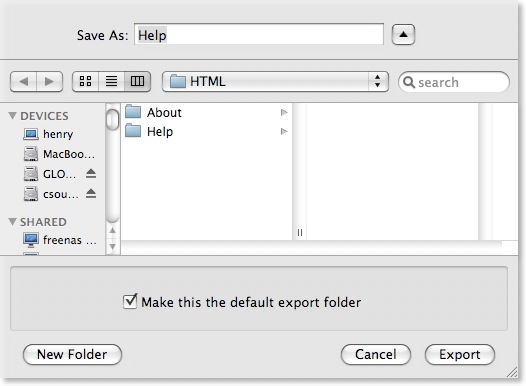
I also tell RW to make this my default export folder. After export, the Help folder will contain all of the files needed for the web pages, including css and images.
3) Import the HTML Into Your XCode Document
This one requires a little care to make sure you get the options correct. Make a mistake, and you might be wondering why your HTML doesn’t show up or doesn’t update correctly.
Find your XCode directory, and grab your exported Help directory directly into XCode’s left column - the source code area. A panel will pop up offering you options on how to copy it. You need to:
- Turn off Copy Items option.
- Create Folder References.
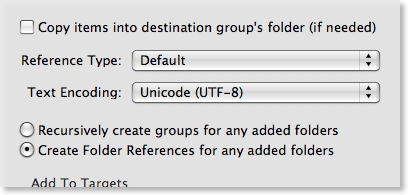
With these settings, you are telling XCode to link to the folder you added. When you update that folder later, the link will point to your new data. If accidentally you tell XCode to copy the items into your group, you will lose your folder organization of your files. If you recursively create groups, you will no longer be able to update your HTML without recopying it directly into XCode again. Either error may require going into XCode and/or the project directory and deleting the files you added.
4) Loading the HTML in Code
The code I use looks for the directory containing my HTML (in this case, the directory Help), appends the file name index.html onto the path for this directory, and then opens HTML.
If I attempted to look for the file instead of the directory, the app couldn’t find it. I’m assuming that this is a limitation of the Bundle search routine, in that it only looks for files in the main bundle and appropriate language bundles, and not recursively through any other directories.
Here’s the code:
There are many ways to open HTML within a UIWebView. This is one of the mechanisms that will ensure that the baseURL required by your HTML code is correct.
Note that index.html is the default name given to the “home page” it creates. You could use this method to open any page within this folder.
5) Updating Your HTML
Now, as you edit your HTML in RW, you’ll need to re-export it everytime. However, assuming that you export it in the same manner as step 2 above, you will not need to re-import it into XCode. It will update in your application correctly on your next build.
Limitations
RW and some themes will generate PHP code under various circumstances. These files will not interpret correctly when stored locally within your app. I also do not know how UIWebView interprets javascript when stored locally.
Problems?
The errors I have made more than once usually involved step #3. If you are having problems, completely remove the HTML from your project and from the project directory, and try adding the directory to the XCode project again.
Here I describe my process for doing this.
1) Create the RapidWeaver Document With an Appropriate Theme
RapidWeaver (RW) uses “Themes” as templates for its webpages. The vast majority of themes available for RW are geared towards computer screens. Those that are geared to the iPhone have more bells and whistles than I would desire for a help document. I really only want RW to handle my multiple pages easily, plus give me the WYSIWYG editing I desire.
The theme I’m currently using for my prototype is the RW supplied theme “iPhone” (no big surprise here). This has a sidebar feature that I will eventually edit out.
Another possibility is using the “No-Theme” from EikePreuss.de. This has no frills to it, but lacks an appropriate setting to specify 320 pixels as the default web page width. To use this, I would need to edit it, too.
Once you’ve got your HTML page(s) set up, you will need to have RW export them.
2) Export the HTML Directly to Your Project Folder
I’ve been a lazy developer, in that I’ve not set up a central Source Code Management system. My SCM consists of duplicating the entire directory containing my XCode project at every reasonable step of development. This is suffices quite nicely, as I rarely need to go back to previous versions of source code, and I don’t share development with anybody.
So, to keep my help files lock step with my code, I export my HTML directly to the project directory. (I could also keep my RW document in the project directory, but for different reasons, I don’t do that now...)
In the directory containing my XCode project, I create a folder called HTML, and this is the folder to which I export my RW generated web pages. Here, I give the exported webpages the name “Help”:
I also tell RW to make this my default export folder. After export, the Help folder will contain all of the files needed for the web pages, including css and images.
3) Import the HTML Into Your XCode Document
This one requires a little care to make sure you get the options correct. Make a mistake, and you might be wondering why your HTML doesn’t show up or doesn’t update correctly.
Find your XCode directory, and grab your exported Help directory directly into XCode’s left column - the source code area. A panel will pop up offering you options on how to copy it. You need to:
- Turn off Copy Items option.
- Create Folder References.
With these settings, you are telling XCode to link to the folder you added. When you update that folder later, the link will point to your new data. If accidentally you tell XCode to copy the items into your group, you will lose your folder organization of your files. If you recursively create groups, you will no longer be able to update your HTML without recopying it directly into XCode again. Either error may require going into XCode and/or the project directory and deleting the files you added.
4) Loading the HTML in Code
The code I use looks for the directory containing my HTML (in this case, the directory Help), appends the file name index.html onto the path for this directory, and then opens HTML.
If I attempted to look for the file instead of the directory, the app couldn’t find it. I’m assuming that this is a limitation of the Bundle search routine, in that it only looks for files in the main bundle and appropriate language bundles, and not recursively through any other directories.
Here’s the code:
NSString *path = [[NSBundle mainBundle] pathForResource:@"Help" ofType:nil];
path = [path stringByAppendingPathComponent:@"index.html"];
NSURL *url = [NSURL fileURLWithPath:path];
NSURLRequest *request = [NSURLRequest requestWithURL:url];
[webView loadRequest:request];
There are many ways to open HTML within a UIWebView. This is one of the mechanisms that will ensure that the baseURL required by your HTML code is correct.
Note that index.html is the default name given to the “home page” it creates. You could use this method to open any page within this folder.
5) Updating Your HTML
Now, as you edit your HTML in RW, you’ll need to re-export it everytime. However, assuming that you export it in the same manner as step 2 above, you will not need to re-import it into XCode. It will update in your application correctly on your next build.
Limitations
RW and some themes will generate PHP code under various circumstances. These files will not interpret correctly when stored locally within your app. I also do not know how UIWebView interprets javascript when stored locally.
Problems?
The errors I have made more than once usually involved step #3. If you are having problems, completely remove the HTML from your project and from the project directory, and try adding the directory to the XCode project again.